Thursday, April 22, 2010

Organic Biscotti for Earth Day


Long before organic was trendy, or 'slow food' even existed, my friend Val was extolling the virtues of organic and whole unprocessed foods to anyone who cared to listen. She was environmentally conscious in every way, the only person I knew back then who made the effort to recycle kitchen waste into a large compost pile in the backyard (and yes, it was often smelly). Many of my earliest taste memories were experienced at Val's house, where I spent many afternoons with her daughter Palma (still one of my best friends to this day). It's where I first tried organic yogurt (so rich and flavorful it didn't even need the 'fruit on the bottom'), learned what REAL cheese tasted like (no, it doesn't come in individually wrapped orange squares), tasted caraway seed for the first time (is this why I'm so obsessed with Irish soda bread?), was fooled into thinking carob was chocolate (pretty cool to a nine year old), and where I would ruin my dinner filling up on rye crispbread slathered with sweet local butter (a revelation, especially when you were used to margarine from a tub and wonderbread). They also had their milk delivered - creamy local organic milk, housed in smooth glass bottles, lined up neatly on their doorstep. It was a brand new world every time I stepped foot into their house and I often found myself overstaying my visit, hoping that if I hung around long enough, they'd agree to adopt me.


I can't even begin to thank Val and her family for all those happy memories. Those experiences shaped my life in so many positive ways (not only foodwise, though it's probably why I became a foodie...did I mention that they also introduced me to sushi?) Through example, Val's family taught me to always to respect the earth, never to be wasteful or take things for granted, and that ultimately, life is not about material possessions, but rather, the people you love and hold dear.

Many years have past since those childhood afternoons, but I still keep in close touch with Val and her family. Decades later, I still get that feeling of wonderment whenever I visit Val's home (different house, but same magical aura). And she's still introducing me to new taste experiences. On our last visit to Vancouver we met up for an early dinner at
Aphrodite's Cafe, a neighborhood eatery/pie shop that specializes in organic, seasonal, and eco-friendly comfort food.

Clockwise from top left: 'Portobello Belle' thin crust pizza; vegetable pot pie; spinach, apple & pecan salad; apple & cheddar sandwich with meadow side salad; ricotta cheesecake with fruit coulis; strawberry rhubarb pie.

When I told Val that I blog about food, she generously offered to share her recipe for organic Biscotti all'Anice (
Anise Biscuits). Val swears her biscotti are virtually identical to her Italian mother-in-law's secret recipe from Abruzzo. I should warn you that these are not the giant biscotti 'on steriods' you would typically find in coffee shops. These petit old-world Italian biscotti are completely unadorned (no chocolate coatings or crazy ingredients) allowing you to appreciate the simple flavor and tender buttery crumb. A hint of sweet licoricey anise makes these truly addictive!

I've been saving Val's delicious organic recipe for Earth Day, but trust me, you'll want to make these more than once a year. Enjoy!


VAL'S BISCOTTI ALL'ANICE
(makes 24 big ones or 36 smaller ones)

Ingredients:
1 cup sugar (organic)
1/2 cup butter (organic unsalted)
2 large eggs (organic, free range)
1 egg, separated (organic, free range)
1 Tbsp anise seeds, lightly crushed with a mortar & pestle
1 Tbsp baking powder (organic)
3 cups unbleached flour (organic)
1/2 tsp sea salt
1 Tbsp milk (organic)

Directions:
Preheat oven to 350 degrees F.
Cream sugar and butter till fluffy; beat in the 2 whole eggs, 1 egg white and anise seeds till blended.
Stir together flour, baking powder and salt.
Blend flour mixture into egg mixture.
On floured surface (or in a large bowl), knead dough 1 minute or till smooth.
Divide dough in half.
On greased baking sheets, form dough into 2 long, flat loaves, 3/4" thick, 2" wide and 14" long.
Beat egg yolk with milk; brush over top and sides of loaves.
Bake at 350 degrees F for 25 to 30 minutes or till pick comes out clean.
Cool slightly. Cut loaf diagonally into 3/4" wide slices. Lay slices on sides on a baking sheet and bake 5 - 10 minutes, turning over once, till golden and lightly toasted.
Cool on racks.

Serve with coffee (great for dunking) or tea.

Phyllis' Notes:
I have dark coated non-stick baking sheets so I lined them with greased parchment paper so the bottoms wouldn't burn. Since I couldn't cut directly on the baking sheet, I used the parchment paper to gently transfer the loaves to a wooden cutting board. I cut the loaves when they were still warm into 5/8" vertical slices (totally forgetting to slice diagonally!) resulting in approximately 36 petit biscotti (minus the two I ate before the second baking). During the second bake, I toasted the slices for about 5-7 minutes on each side but they didn't get much darker in color, resulting in an emergency phonecall to Val. She said the recipe is pretty forgiving and to "play around with them to find the size you like, and the level of doneness". Toast them for a few minutes longer if you want them extra hard for dunking.


How are you celebrating Earth Day 2010? For more ways to get involved, check out:
http://www.earthday.org/

Share/Save/Bookmark

Tuesday, April 20, 2010

First Time Tiramisu


The first tiramisu I ever made. Looks yummy, right?

I brought it over for Easter dinner at my in-laws' house a couple weeks ago (and of course I forgot my camera that day so I had to get my brother-in-law Kevin to email me his photos - thanks Kev!)

Also a big thank you to our friend Bob for recommending his favorite tiramisu recipe (from Cooks Illustrated). I found the same recipe online,
Tiramisu Without Raw Eggs, at America's Test Kitchen (requires free registration). There's also a version with the traditional raw eggs, but I chose the cooked egg version since I was feeding it to a crowd.

Making the tiramisu was very straightforward but required me to finally take my brand new KitchenAid mixer out of the box after 9 long years (I know, the SHAME). I also experienced some sticker shock when shopping for ingredients - 1 1/2 pounds of mascarpone cheese is expensive! But this recipe feeds a huge crowd, making 10-12 generous servings. I also followed Bob's advice and substituted Kahlua for the rum (but you might want to stick with the rum if you prefer more of an alcoholic 'kick'). And I topped it off with both cocoa powder and chocolate shavings (you can never have too much chocolate).

I probably could have divided the mascarpone filling a little more evenly to get perfect-looking layers, but the tiramisu sliced up beautifully, with very clean-looking edges, just like what you would get at an Italian restaurant. The end result garnered a lot of 'oohs' and 'ahhs'. And the taste? A-MA-ZING! Not too shabby for my first time.


Share/Save/Bookmark

Friday, April 16, 2010

Friday foodie news...


The
2010 International Food Blogger Conference is taking place in Seattle from August 27th - 29th. This year's keynote speaker is James Oseland, editor-in-chief of Saveur Magazine (Top Chef fans also know him as a judge on Top Chef Masters). Registration will be open to the public starting this Monday, August 19th. The $350 ticket price sounds steep but apparently the generous goodie bag will make it worthwhile. There's also a special room rate being offered by the host hotel, Hotel Monaco.


And for all you poutine fans out there,
Smoke's Poutinerie and Major League Eating are hosting the first World Poutine Eating Championship in Toronto on Saturday, May 22nd. Despite the recent controversy about the contest being closed to Quebec participants (Quebec is the birthplace of poutine, afterall) I think it'll still be a fun time. I met Ryan Smolkin (owner of Smoke's Poutinerie) in Drummondville, QC last year (we were both there to attend the Festival de la Poutine) and he seems to take his poutine very seriously, taking the trouble to import authentic squeaky cheese curds from Quebec for his 20 varieties of poutine.

Professional registration
for the championship is now closed but they are still accepting entries for amateurs. Just submit your "I once ate..." or "I love poutine so much..." story here and Smoke's Poutinerie will select 3 amateurs to compete with the pros. You have till May 15th to enter and you must be 18 years old and a resident of Canada (excluding Quebec). Pity I'll be in Vancouver on May 22nd, I think I'd be a shoe-in for this contest (see my posts for 12 poutine in 12 days & Poutine-Palooza: Festival de la Poutine). I guess there's always next year :)


Share/Save/Bookmark

Wednesday, April 14, 2010

Minestrone For Allergy Sufferers...


Strange that I'm making a hearty soup during the springtime. But while most people are outdoors enjoying the warmer weather, I'm stuck inside, battling seasonal allergies (just call me the 'bubble girl'). I was craving something warm, comforting, and soul-satisfying...and minestrone fit the bill. Chock-full of vegetables, beans and pasta, it would definitely satisfy my voracious appetite (could sneezing a thousand times a day be burning a ton of calories?)

Once upon a time I wouldn't have dreamed of making soup from scratch. Flashback to my 9 year old self... as a latchkey kid, I would often heat up a can of Campbell's chunky soup when I got home from school. On rainy weekends indoors, I watched cooking shows on PBS, scoffing at the chefs (notably Julia Child) who would go through the trouble of making soup from scratch. I wondered whether Julia knew about my beloved chunky soup in a can.

Obviously a lot has changed since then. I finally realized that you can't get that homemade slow- simmered taste from canned soup. So despite my itchy eyes, runny nose, and labored breathing, I happily peeled, diced, stirred, caramelized, and simmered ingredients for hours last night. And you know what? It was all worth it.


MINESTRONE FOR ALL SEASONS

(adapted from Winter Minestrone, Gourmet Magazine Jan 2009)
printable version
Serves 4-6
Time required: 2 1/2 hours

Ingredients:

2 oz chopped pancetta
1 1/2 red onions, chopped
3 celery ribs, chopped
2 medium carrots, peeled and chopped
1/4 cup extra virgin olive oil
6 garlic cloves, minced
1 Tbsp tomato paste
1 15 oz can of Italian style diced tomatoes (w/ basil, garlic, oregano)
6 cups of low sodium chicken broth
1 lb of escarole, washed thoroughly and roughly chopped
1 15 oz can of cannellini beans, rinsed and drained
1 piece parmesan rind
8 oz (1/2 box) of ditalini pasta (or similar sized pasta)
kosher salt & freshly ground black pepper to taste

Directions:
Combine pancetta, red onions, celery, and carrots in extra virgin olive oil in a large heavy-bottomed saucepan. Season with salt and black pepper. Cook over medium heat for 10 minutes, stirring occasionally. Add in garlic. Continue to cook over medium heat for 35 minutes, stirring occasionally, until vegetables start to caramelize and stick to the bottom of the saucepan.

In the meantime, cook ditalini pasta according to instructions on the box. Drain and toss with some olive oil to prevent pasta from sticking together. Set aside.

Push softened vegetables to the side of the saucepan and add tomato paste. Cook for 3-4 minutes, letting tomato paste slightly caramelize (be careful not to let it burn). Stir tomato paste into vegetables and cook for another 2 minutes.

Add canned tomatoes and chicken broth, scraping up any browned bits from the bottom of the saucepan. Bring to a boil, add in 1/2 of escarole and parmegianno reggiano rind and reduce to a simmer. Simmer uncovered for 45 minutes.

Add remaining escarole and cannellini beans, cook for another 10 minutes. Taste for seasoning, adding additional salt and pepper as needed. Remove parmesan rind. Stir in cooked ditalini right before serving.

Serve with a crusty piece of bread. Enjoy!

p.s. Looks like I'm not the only one making soup this week - for more springtime soup inspiration, check out Justin's
curried lentil soup at Justcook nyc.


Share/Save/Bookmark

Sunday, April 11, 2010

FOOD FACE


Got a picky eater at home? Or someone who likes to play with their food?

FOOD FACE was too cute to pass up, just bought two of them for my nieces.

You can find it online
here.


Share/Save/Bookmark

Wednesday, March 31, 2010

Durian for Dummies


First off, let me clarify that it's us (Kris and I) who are the 'dummies' here. Although this isn't the first time we've tried
durian, it's the first whole durian that we've ever brought home (which is nothing short of a miracle given that a few years ago Kris wouldn't even let me come near him after I ate durian flavor ice cream). And though I'm no stranger to consuming weird food, I've always been intimidated by the durian's seemingly impenetrable shell. So what made Kris finally welcome this notoriously stinky fruit into our house? His highly competitive nature, of course!


We've been having so much fun coming up with entries for
Tangled Noodle and Savor the Thyme's Eating Your Words Challenge that we decided to enter AGAIN. Yeah, I know...obnoxious, right? But you have to understand how big a fan I am of the celebrity guest judge, Andrew Zimmern from Bizarre Foods! I mean he's like my IDOL (hey, did I mention that it's Weird Food Wednesday?!) Plus there are no restrictions (at least not currently) as to how many times we can enter. And like any other competition, Kris really wants to win (remember when we ate a record breaking amount of ice cream for the Ice Cream Social last year because Kris thought it was an all-you-can-eat competition?) Maybe they'll be a prize for the person who submits the most entries (LOL).

I wanted to tailor this submission specificially for Zimmern, so I started brainstorming about what I could make with bizarre foods...
maybe spell C-R-U-N-C-H-Y with crickets? Write A-W-F-U-L with offal? But I didn't necessarily want it to be a gross-out kind of thing. Once again, my brilliant hubby came to the rescue - "Let's do something with durian!" Ah...the durian, otherwise known as the 'King of Fruit'. How apropros...it's the
one thing Andrew Zimmern has not been able to stomach (this from the guy who's eaten moose nose jelly and giant beetle larvae with relative ease). An entry showcasing durian, Zimmern's evil archnemesis, is bound to get his attention!

After several rounds of hi-fiving my husband, reality set in. I've never made anything with durian before, let alone even know how to open one! Kris suggested we hit it with an ax and if that doesn't work he'll take out the chainsaw. Luckily my parents, lifelong durian enthusiasts, were only a phone call away. My mom was pretty excited at the prospect of her only daughter buying her very first durian (awww...) but said to call back after we'd purchased a frozen one. "Frozen?! How many days does it take to thaw?" "Only a couple," replied my mom," but make sure you put it by the heater." Hmmm... this posed yet another problem - the thought of keeping a smelly durian inside the house while it thaws is Kris' worst nightmare. Luckily the spirit of competition prevailed and we set out to get a frozen durian from the local Asian food market.

When we got to the market, I didn't know the first thing about picking a durian so I chose a medium size specimen that had a tiny little crack in it. I figure that the split would be a good starting point for opening it.

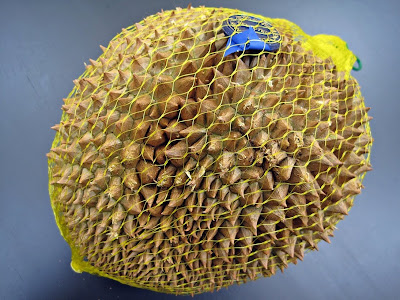
Here's our 6 lb baby, thawing out in our sunroom (oh man, will my sunroom forever smell like durian?):


There are several varieties of durian but according to my dad, most of the ones you'll find in North America have been imported from Thailand, and have been bred to produce a smaller seed-to-flesh ratio. This durian is the Morn Thong (a.k.a. golden pillow or butter almond) variety from Thailand:


When I called my parents to give them a progress report, my dad immediately asked about the shape of the durian. He says that when selecting a durian, he ignores the symmetrical-looking specimens and always picks one that is bulging out on one side (a sign that there's a large pod of durian meat inside). My durian was clearly protruding out in one area - woohoo! My dad said that section will undoubtedly contain the largest pod with the sweetest meat (he was right). He also asked whether the durian still looked 'fresh' - was there still a slight tinge of green on the shell? Were the spikes and stem intact and in good condition? Yes and yes (although you'll notice some busted spikes in my photo but those injuries were sustained while rolling around in our trunk during the drive home). Then my mom got on the phone to ask whether the skin had "any visible cracks in it?" Yes again! (I guess this means I'm a 'natural' at selecting durian). My mom says you should always look for one with a small crack because it means the durian ripened successfully before it was frozen, but never pick one that has splits all over because it means it's probably past its prime.


Over the next couple days, the skin between the spikes became more supple and the odor intensified. This is a good sign according to my father - a durian that doesn't stink is most certainly a dud. To me, the ripening durian smelled wonderfully sweet and tropical, reminding me of Malaysia. To Kris, it smelled like rotting fruit but at least he wasn't disgusted about it (yet).

By the second day, hairline cracks were beginning to appear in the shell, so I gently helped them along by applying gentle pressure with my fingernail from the stem to the base. See how the cracks have formed a star-like pattern on the base?


And I couldn't resist prying open one of the cracks and deeply inhaling the fragrance within (Kris referred to it as the 'evil within', saying it looked like some kind of alien creature inside):


OPENING TIME!!

Kris in his durian protective wear:


Gently pulling the sections apart with his bare hands:


The durian flesh easily fell out of the pods, but Kris used a spoon because he didn't want to touch the 'alien babies' with his bare hands:


Here's that sweet luscious piece my dad was talking about:


The seed separates easily from the soft creamy pulp:


As I was rolling up my sleeves to dig in, Kris quickly disappeared to another part of the house to hide out. The odor had reached an unbearable level for him so he was steering clear of the kitchen until I was done with my experimentation.

After polishing off that choice piece of durian (buttery, creamy, uber-sweet...how could anyone not enjoy something known as the 'butter almond'?), I set a few fleshy segments aside for my contest entry, but the remainder went into a plastic storage container, which I then sealed inside 2 heavy-duty freezer bags before placing it inside another storage container. For some additional insurance, I surrounded the container with several boxes of baking soda before placing it inside my basement mini-fridge.


To dispose of the durian shell, I wrapped it up in newspaper, tied it up in several layers of plastic grocery bags and put it outside in a tightly covered garbage can. Odor contained!

My next challenge was to make something palatable enough to convince Mr. Zimmern to give durian another try. In Vancouver last year, I tried a delicious durian sticky rice from
Phnom Penh (a local Cambodian restaurant and popular foodie destination). Sticky rice was mixed with tiny pieces of durian, topped with quivering spoonfuls of luscious durian pudding and then smothered in rich coconut milk. Even Kris admited that the taste was "tolerable".


So with that dessert as my inspiration...this is what I came up with...

Black Sticky Rice Pudding with Durian Custard & Durian Cookie Letters:
A dessert for durian haters (and the uninitiated)


Every component of this dessert has some form of durian in it. The rice pudding and the custard contain pureed fresh durian. The cookies have been flavored with ground durian chips and durian extract. Coconut milk and pandan essence are perfect complements, calming the intense flavor of durian. And the unmilled black glutinous rice provides a chewy and colorful contrast to the golden pillowy custard, while the cookies add a nice crunch. You can find all of the specialty ingredients (including the durian) at your local Asian food market. I hope you'll try it :)

Durian Custard


Ingredients:
3/4 cup evaporated milk
1/2 cup sweetened condensed milk
3/4 cup canned coconut milk (stir can to mix the heavier cream with the thinner liquid underneath)
3/4 cup fresh durian pulp
1 egg
3 egg yolks
2 1/2 Tbsps superfine sugar

Directions:
Preheat oven to 350 degrees F. Boil water for the bain-marie/water bath.

Puree durian pulp with coconut milk in a food processor. Set aside, reserving 1/4 cup of the resulting puree for the black sticky rice pudding.

Beat egg yolks and egg. Add in evaporated milk, sweetened condensed milk, sugar, and durian puree. Whisk till blended. Strain custard mixture by pouring through a fine-mesh sieve into another bowl.

Set up water bath - I placed a 1 quart-sized oval Corningware dish inside a rectangular 9 x 13 glass casserole. Pour custard into the inner baking dish. Cover custard tightly with aluminum foil. Carefully pour hot water into the outer casserole until it reaches halfway up the inner baking dish.

Bake at 350 degrees F for 45- 50 minutes until the middle is set (will still wiggle slightly). Let cool.

To serve, use a large serving spoon to carefully scoop up generous slices of custard. Serve over black sticky rice pudding or enjoy on its own!


Black Sticky Rice Pudding


Ingredients:
1 cup black glutinous rice*
1 3/4 cups water, plus water for soaking rice
1 cup light coconut milk
1/4 cup white sugar
1/4 cup dark brown sugar
1 tsp pandan extract
pinch of salt
1/4 cup of reserved durian/coconut milk puree (from custard recipe above)

Directions:
Pick through rice to remove any tiny pebbles. Wash rice a couple times to remove grit and loose husks. Soak rice for 8 hours (helps to plump it up).

Drain rice and add to a saucepan with 1 3/4 cups of water. Bring to a boil. Reduce to simmer and cover. Cook for 35-45 minutes until water is absorbed and rice is cooked through (will retain a chewy texture). Alternatively you can use a rice cooker with the same proportion of rice to water.

In another saucepan, combine light coconut milk, white sugar, brown sugar, pandan extract, salt and durian/coconut milk puree. Bring to a boil and reduce heat immediately. Stir in cooked sticky rice. Simmer at low heat, stirring frequently until most of the liquid has been absorbed. The sticky rice pudding can be served warm or cold.

*Note: make sure you use black glutinous rice and not 'forbidden rice' or black Chinese rice (neither are glutinous)


Durian Letter Cookies


I was initially planning on making durian icing to write my letters. But Kris came across a bag of durian chips at the Asian food market and suggested I grind them up and make cookies out of them.


Imagine our surprise when we tasted them - no smell or durian flavor whatsoever and they weren't even sweet!


The bag listed only 3 ingredients - durian (97.5%), salt and vegetable oil, so despite the lack of pungency, these chips were legit. Don't get me wrong, the durian chips were quite delicious, even addictive, reminding us of taro or cassava chips. But to make up for the lack of flavor, I threw in some durian extract. And yes, I cheated a bit with packaged cookie dough - I just didn't see the point in making an entire batch of dough and wasting a ton of flour and butter to make a few letters.

Ingredients:
5 oz of refrigerated sugar cookie dough (about 1/3rd of a package)
1 oz (a large handful) of durian chips
1/2 tsp of durian extract
1 -2 Tbsp water

Directions:
Preheat oven to 350 degrees F. Line a cookie sheet with parchment paper.

Process durian chips in a food processor till finely ground.

Knead the ground durian chips into the sugar cookie dough until well incorporated. Add in durian extract and knead some more till evenly distributed. The dough should be getting soft at this point. Transfer dough to a small bowl and add in 1-2 tablespoons of water, continuing to knead until it becomes soft enough for piping.

Place dough into a quart sized storage bag (use a good quality freezer bag so the sides don't burst when piping). Snip a tiny hole in the corner (no icing tip needed, just a steady hand) and pipe thin letters on to the parchment lined cookie sheet. Bake at 350 degrees F for 3-4 minutes until done (watch them carefully, they go from being uncooked to being burnt very quickly).

Use letters to decorate your sticky rice. Alternatively, you could bake these up as tuiles (thin crisp cookies) and tuck them into your dessert.


So after all of this, has Kris finally become a durian convert?

Sadly, no.

He claims that he's too emotionally scarred from his first few encounters to ever enjoy it. The smell alone psychs him out and he can't seem to get past it.

However, I still consider this a personal victory because Kris was able to eat a few spoonfuls of the dessert without retching. He says this dessert is a good place to start for beginners ("start with the cookie..then try the sticky rice, and finally the custard"). And the next thing you know, you'll graduate to eating the real fruit. So Mr. Zimmern, won't you give durian another try?

And just in case anyone was wondering, 5 baking soda boxes were no match for the formidable durian. Over a 24 hour period, the smell inevitably crept out, layer by layer, until it had completely commandeered my poor little mini-fridge!

4/08/10 Update: Well, we didn't win (no regrets, I'm still glad we opened our first durian), but our other entry, Spelling with Sushi, got an honorable mention! Be sure to check out Part I and Part II of the challenge roundup, as well as the winning entry here.


Share/Save/Bookmark

Monday, March 29, 2010

Spelling with Sushi


A couple days after I made my chocolate swirl bark for
Tangled Noodle & Savor the Thyme's Eating Your Words 2010 Challenge, I found out that Andrew Zimmern was judging (!!!!!) and decided to increase my chances of becoming a finalist by submitting another entry.

I also wanted to raise the level of difficulty because I had a feeling there was going to be some serious competition this year. Kris actually came up with the idea for "spelling with sushi", but of course he was leaving 100% of the execution up to his darling wife (which is the only reason he's willing to share the credit with me).

Over the years I've become quite proficient at making sushi at home (came out of necessity when I first moved to a small town and the only place to get sushi was Mr.China, a local Chinese take-out place), but spelling with sushi? The pressure was definitely on.

I decided the easiest way to do this was to stick with sushi that I was already comfortable making - california rolls, tamago, inari, and vegetable rolls (no raw fish because hubby gets squeamish around it and it's difficult to find sushi-grade fish where I live).

For the rice, I use this
no fail recipe to make perfectly seasoned sushi rice (but I use my trusty rice cooker instead of a pot, and I don't always use the kelp). The recipe will make a large quantity of rice, enough to make around 8 maki rolls. I alternate between Nishiki and Kokuho Rose brands of sushi rice, depending what I can find in the supermarket, but for this challenge I used Nishiki. And any decent brand of nori will do (today I used Takaokaya yakinori). You will need a bamboo sushi mat, which I always wrap tightly with plastic wrap so nothing sticks to it (and for easy cleanup). You'll need to moisten your fingers while working with the rice (the rice gets sticky) so fill a small bowl with water and add in a splash of rice vinegar. And use a moistened sharp knife for making clean cuts. Here is a good video for making a basic maki roll. Give yourself lots of time to prepare the rice and ingredients and to practice your rolling technique, especially if you are serving the sushi to guests. Rolling sushi takes practice but don't give up - if I can do it, anyone can!

For the first 'letter' I made an oshinko maki roll with julienned
takuan (neon yellow pickled daikon) as the primary filling. I supersized the filling to ensure I would have a large enough area to 'write' my letter. After cutting up the rolls and selecting the prettiest and roundest piece, I individually inserted pieces of julienned red bell pepper to form an "S" (using a wooden skewer to wiggle in 'entry points' for the bell pepper).


Next I stuffed an
inari pouch with sushi rice (careful, the pouch is fragile and could break if overstuffed) and used slivers of shiitake mushrooms to spell a "U" on top. You can find canned inari pouches at Asian supermarkets or the ethnic aisle of a well-stocked supermarket.


The next roll is an 'inside-out
California roll' (seaweed on the inside, rice on the outside). It looks fancy but is not difficult to do - check out this video for direction. The primary filling is shredded imitation crab stick and the 'S' is spelled with thin slivers of strategically placed seedless cucumber (utilizing my wooden skewer 'wiggle technique' again). I sprinkled the rice with black sesame seeds for added flavor and crunch and topped the roll with thin slices of buttery avocado.


I also wanted to include some
nigiri sushi but since I wasn't using raw fish, I thought I'd make some crowd-pleasing tamago (sweet egg omelette). Normally when I make tamago at home I don't worry too much about the aesthetics because only hubby and I will see it. But this time I had to make it look as pretty as the restaurant versions. Here is the old standy recipe I use (time-saving tip: use instant dashi granules to make the dashi stock instead of making it from scratch). And you don't need a special tamago pan, only took me a couple tries to get an unblistered omelette using a regular non-stick frying pan. With a small knife I freehand cut an 'H' out of the tamago and placed it on top of some hand formed seasoned rice, securing it with a thin strip of nori.


Was super relieved to get to the last letter, which only required cutting an "I" out of some kani (
imitation crab stick) and placing it on top of some rice secured with nori.


Lastly, I assembled the sushi letters on a pretty platter, added some pickled ginger and wasabi and voilà...SPELLING WITH SUSHI!


4/08/10 Update: Well, we didn't win, but our Spelling with Sushi got an honorable mention! Be sure to check out Part I and Part II of the challenge roundup, as well as the winning entry here.


Share/Save/Bookmark

Friday, March 26, 2010

Chocolate that speaks to you...


Fellow food bloggers
Tangled Noodle and Savor the Thyme are once again hosting the much anticipated Eating Your Words Challenge.

You have until March 31st to enter and the prize for this year's challenge is an
aebleskiver pan! Now if the promise of warm aebleskivers for breakfast hasn't already got you playing with your food, perhaps the thought of a celebrity judge (Andrew Zimmern!!!) gazing upon your creation will get those creative juices flowing.

I wanted to come up with an entry that used ingredients I already had in the pantry. Then I remembered the
chocolate mint bark that Justin from Justcook nyc recently made. Perfect - I always seem to have leftover chocolate chips around, plus chocolate bark is so easy that you don't even need a recipe.

Just melt some white and dark chocolate chips separately, pour the dark chocolate on some parchment paper and before it begins to dry, pour the melted white chocolate on top, using a wooden skewer to swirl the colors together (or in my case, write a word).

Thanks for the inspiration, Justin! I'll make you some aebleskivers or takoyaki if I win :)


Share/Save/Bookmark

Monday, March 15, 2010

Vegan Irish Soda Scones

Last year around this time, after I baked a whopping 9 loaves of Irish soda bread, my friend Heather asked me whether I could help her fix a recipe for vegan Irish soda scones she had gotten from one of her vegetarian magazines. She'd been looking forward to finally trying a vegan version of Irish soda bread, only to be disappointed by the dense hockey pucks made by that recipe.

Rather than try to doctor a crappy recipe, I thought a better starting point would be the winning recipe from last year's baking marathon,
Irene Sullivan's Irish Soda Bread. To make it vegan, I followed online instructions to make a vegan version of buttermilk by curdling soy milk with vinegar, replaced the stick of butter with vegan buttery spread, and substituted the eggs with some Ener-G egg replacer. Instead of making one loaf of bread, I formed the dough into 8 healthy-sized 'scones' per Heather's request. And no, these babies weren't made using the traditional scone technique, where cold butter is painstakingly cut into the flour until the mixture resembles course crumbs. When it comes to baking, I prefer to use the 'throw everything in the bowl and mix' method!

But how good could these taste without real buttermilk, eggs or butter?

"Pretty darn good!" says hubby Kris.


Vegan Irish Soda Scones (adapted from Irene Sullivan’s Irish Soda Bread)
Printable Version

Servings: 8 healthy-sized scones

Ingredients:
3 cups all purpose flour
3/4 cup sugar
1 teaspoon salt
1 teaspoon baking soda
2 teaspoons baking powder (double acting)
1 cup vanilla soy milk
2 Tablespoons distilled white vinegar
4 oz or 1 stick of vegan butter (ie.
Earth Balance Vegan Buttery Sticks)
3 teaspoons
Ener-G egg replacer
4 Tablespoons warm water
1 Tablespoon vegetable oil
1 Tablespoon caraway seeds
1 cup (about 5 oz) of currants

Equipment: Baking sheet pan or cookie sheet, lined with parchment paper

Directions:
Preheat oven to 375 degrees Fahrenheit. Position rack in the center of the oven.

Make vegan buttermilk by mixing soy milk with vinegar. Let mixture stand for a few minutes until it curdles.

Soften vegan butter by microwaving for 8-10 seconds. Don’t over microwave; you want it softened, not melted. Set aside.

Combine all dry ingredients (flour, sugar, salt, baking soda, baking powder) in a large mixing bowl. Stir with a fork to quickly distribute ingredients. Set aside.

Prepare Ener-G egg replacer by mixing with warm water (equivalent to 2 eggs).

Make a well in the middle of the dry ingredients, and add vegan buttermilk, softened vegan butter, Ener-G egg replacer, vegetable oil, caraway seeds and currants. Mix everything with your hands until ingredients are evenly distributed and moistened (about 2-3 minutes). Do not over mix. Batter will be slightly wet. Drop 8 rounded portions of the batter on to prepared baking sheet.

Bake for 25 minutes at 375 degrees F. Don’t worry if some of the scones expand while baking and merge with each other, they will break apart easily later on. Test doneness by inserting a toothpick – it should come out clean.

Serve warm with strawberry preserves and vegan buttery spread.

Happy St. Patrick's Day :)
ps. This is my submission to
The Daily Spud's Paddy's Day Food Parade


Share/Save/Bookmark

Tuesday, March 9, 2010

It's Shamrock Shake time!

Get 'em while they're still here!

Or perhaps you'd prefer a Guinness shamrock? ;)


Share/Save/Bookmark